
TARO
SCIENTIFIC NAME: Colocasia esculenta
FAMILY: Araceae
Botany of Taro
Taro is a member of the Araceae family which includes such other well-known plants as philodendrons, dieffenbachias (dumb canes), anthuriums, pothos, caladium, and alocasia to name just a few. As is the case with taro, many members of the family are well known for their high cellular concentration of calcium oxalate in the form of needle like crystals. These make the plants unpalatable unless they are properly cooked. The dumb cane gets its name from the fact that if one were to eat the raw stem of this plant the crystals would cause such a severe swelling of the throat membrane that one would be unable to talk for several days. Much the same is true if eaten raw.
Botanically the taro is known as Colocasia esculenta var. antiquorum (Schott) Hubb. & Rehd. The varietal name refers to its long history of cultivation and selection by man. The 'original' taro is native to tropical South East Asia and is a plant of the low wetlands.
Distinguishing Hawaiian taro Cultivars
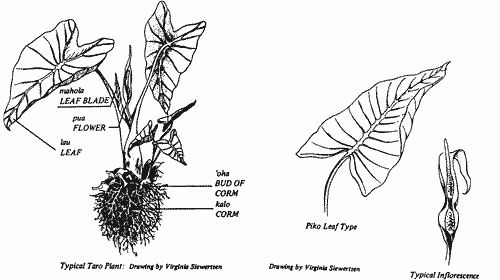
The Hawaiian taro farmer, an acute observer of nature, was able to distinguish the various cultivars by the shape of the leaf, colour of petiole, colour and shape of the corm, colour of the piko (point where petiole joins leaf) and height and shape of the plant. The taros were often placed in groups which shared a uniform characteristic: the piko group had leaves cut to the piko; the mana group had branching corms; and the lauloa group was distinguished by long leaves and petioles. The group names were often followed by a suffix which further described the cultivar, piko keo keo, a piko taro with light-coloured flesh; manu uli uli, a mana taro with a dark colour; lauloa eleele-ula a dark red lauloa. Taros were poetically named after birds, fish and plants which resembled their colouration. Place names and people were sometimes used.
How to cook taro leaves
There are two different kinds of taro leaves - those that must have the mid-rib removed before cooking and those that can be cooked as they are. To prepare luau (taro leaves), wash two bundles or about 2 pounds and cut off the sterns and take out the thickest part of the veins, much as you strip the leaves. Put into a large pot with ½ cup of boiling salt water. The raw leaves are very bulky but they quickly wilt. It may be necessary to put part of the leaves into the pot and cook until they are wilted. Then add the rest. Cook them for 45 minutes to 1 hour over low heat to get rid of the sting that remains if taro leaves are undercooked. Some people believe in changing the water several times during cooking. If you do, rinse the semi-cooked leaves before placing in fresh water. When the leaves are tender, add ½ cup of coconut milk and two tablespoons of butter or margarine. The coconut milk helps eliminate the sting. Be careful not to get the coconut milk too hot because it curdles easily.
Taro leaves may be cooked more quickly in a pressure cooker. Use 1½ cups water and cook at 15 lb. pressure for 15-20 minutes.
How to cook fresh taro corms
Rinse taro corms in cold water and scrub with a brush to clean. Place taro corms in a deep pot; add water to cover and ½ teaspoon of salt. Bring water to a boil and simmer uncovered for 1 to 1½ hours or until soft. Additional water may have to be added during cooking. Allow taro corms to cool, then scrape off skin and dark purple layer of outer meat.
For faster cooking, peel taro, cut in pieces. Pour enough water to cover taro and boil. If taro is to be used for poi, cook longer. Mash taro while still hot. Serve as mashed potato or use it for other recipes.
How to prepare poi
Put poi from bag in large bowl. Mix with hand, adding a little water at a time. Continue mixing and adding water until of desired consistency. To store in refrigerator add thin layer of water over the poi to prevent drying. To freeze, put in containers and freeze. When ready to use, steam over low heat. Mix more water into poi for proper consistency, or heat over low heat with a small amount of water, stirring constantly, and then cool to room temperature.
Ready-mixed poi in small amounts may also be bought in jars in the baby-food section of markets. This may need only a little more water added.
The propagation and cultivation of taro
The procedure most commonly used to propagate taro is by a huli. A huli is the cut-off upper half-inch of the corm with the lower half of petioles attached. When each crop of taro was harvested the hulis were saved to begin a new planting. Offshoots of the main corm could also be used as progagules but were infrequently used for that purpose in Hawaii.
There were two principal methods of growing taros - wetland and dryland. In the wetland method, bordered terraces were constructed and irrigation ditches were laid out from nearby springs and streams to provide a steady flow of water to the terraces. The wetland terraces and ditches at Wailua and Waimea on Kauai represent some of the most involved engineering work in the Pacific with water conveyed over several miles in raised flumes. These structures have survived years of heavy flooding and portions remain in use today.
Hulis were placed in moulds of soil in the terraces and watered carefully until several leaves developed. From this period until harvest the patch is kept flooded with a constant circulation of water necessary for healthy growth. At harvest, the mature corms are loosened with an oo, worked with the toes and pulled by the corms or leaves. Corms were only harvested as needed.
In dryland planting the soil was worked to a suitable tilth with mulch frequently added to improve the moisture-holding capacity of the soil. The hulis were planted, weeded and mulched until maturity.
DATE: September 1996
* * * * * * * * * * * * *
