
BUDDING PISTACHIO NUT TREES
Much has been written and spoken about budding root stock and existing pistachio nut trees. However, the true test is to have something simple which will produce the best results. More importantly, to have a procedure which can be performed by people with limited knowledge of the principles of plant growth.
Those of you who have tried in vain to bud-graft pistachio root stock will know how frustrating and time consuming it can be, especially when the end result is a failure year after year.
The basic requirement for budding is to have a close contact of the cambium layers (tissue between bark and wood) of both stock and scion.
Some favour budding with chip buds, using dormant wood in the Spring just after sap movement. Extensive experimenting has proved (for me) that the best time is mid-January to early March when the sap is flowing at its peak, and now I only 'T' bud, using fresh budsticks taken from selected trees with large buds.
The materials required are few and simple:
• Sharp and clean secateurs (preferably sterilised in methylated spirits or similar.
• Fresh budsticks which have been selected from trees free of virus diseases and other disorders. Budsticks should be placed in a bucket of cold water when cut, and kept cool until budding. Budding from these budsticks should be carried out the day the budsticks are cut and at a temperature preferably no less than 20 degrees centigrade.
• Very sharp and clean budding knife (also sterilised in methylated spirits or similar).
• Good budding tape or budding rubbers (aged, ie one-year-old so that they perish easily).
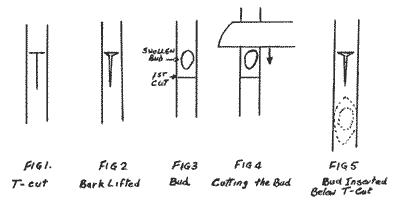
The simplest way of budding a root stock for pistachio nut trees is the common 'T' method. The incision is first made across the stock to be grafted (for the top of the 'T'), then a further incision is made from the top of the 'T' and down the stock for about 20 to 30 mm (Fig. 1)
Care must be taken to use only enough pressure on the knife blade to cut the bark so that it (the bark) can be freely peeled back from the wood using the back of the budding knife.
The bark at the junction of the cuts can be lifted slightly (Fig. 2) by a twist of the knife blade, and the flaps are then opened up by reversing the knife and sliding the bevelled bone end between the bark and wood. It is a good idea to splash cold water onto the area worked on to keep it moist.
To cut the bud from the budstick, use the following procedure. Make the bud length about 20 mm. With a sharp knife, cut around the budstick below the bud (Fig. 3). Hold the budstick with the bud facing you and the index finger of the left (or right) hand directly under the bud to be removed.
Cut the bud away from the budstick with a continuous downward slicing movement of the blade, beginning 10 to 20 mm above the bud and finishing at the bottom cut (Fig. 4). The cut should be deep enough to show a sliver of wood sticking to the bark when removed. After removal of the sliver of wood, it is a good idea to lightly scrape about 2 mm of bark off each end of the sliver to expose the cambium layer. Then dunk it into a bucket of cold water to clean it and keep it moist.
To insert the bud, firmly hold the root stock with one hand, then with the other hand carefully slide the bud between the bark and wood where the incision was made for the 'T'.
Now push the bud down towards the roots to a distance of 10 to 20 mm below the base of the 'T' incision (Fig. 5). The bark will stretch and the bud should be under the bark and below where the incision was made. This is important, as the knife wound will damage the underlying layer, and this will result in the death of the bud if it is over it. To complete the operation. firmly bind over the incision with budding tape or budding rubbers.
If the work has been successful, the bud will quickly push away, and within 2 to 3 weeks a shoot should appear in 20 to 30% of the buds. The rest will swell and remain dormant until next Spring. (The best result I have had was a shoot 320 mm long, one month after budding.) It is also possible the graft will flower the following year.
Finally all foliage below the graft should be cut off. If budding tape has been used, it can be removed during winter, as the bud should be well-established. It is desirable to secure the tree to a stake and to support the new graft.
As you can see, there is nothing new about budding except that correctly choosing the time of budding and bud selection (fresh swollen and mature buds) are essential. Overall, the success rate using the above procedure has been about 90%, compared with chip buds from dormant budsticks at about 10%.
DATE: July 1992
* * * * * * * * * * * * *
